Saturday, August 29, 2015

building a chicken-house

How I built a new house for my chickens

In my garden I have two chickens. They are producing daily fresh eggs, eating vegetables and food remains.

I decided to build a new and larger house, because last week I introduced 3 new indian runner ducks in the family.

I designed the construction to be built from scratch wood parts that I had. I took some ideas from other pictures around the web (try image search for chicken coop).

Basic requirements:
The house not to be directly on the ground
The egg laying nests to be easily accessible
Robust and easy to clean

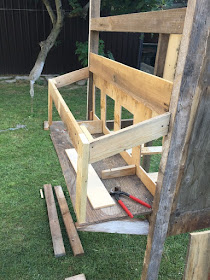
Here are some pictures of the building process.

I started building the basic frame, considering that the legs would have been planted in the ground


My friend Ilir was helping me


This is the back accessible structure for eggs collection


There are four internal nests


the ladder to get in


structure ready for paint. Legs already painted with bitumen.


Painting complete

Positioning

The easily accessible nest shelf


Friday, July 10, 2015

New Lenovo Thinkpad: no more BREAK key


There is not the BREAK key in new Lenovo Thinkpads laptops.


There is not even the PAUSE key.
On older machines, BREAK key was obtained with CTRL-PAUSE


In Lenovo Thinkpad T540p, with italian keyboard, i can get PAUSE with FN-P and BREAK with CTRL-FN-P

Apparently, this is not consistent with other Lenovo Laptops, where you can get BREAK with FN-ALT-B 

(dec2023) On Windows 11, I managed to send to the (lotus notes) application the CTRL-BREAK using the on screen keyboard (osk) and sending CTRL+SCRLK


here is a source:
http://forum.notebookreview.com/threads/no-insert-and-sysrq-keys-on-e220s.579456/#post7505268

Fn+B= break
Fn+P= pause
Fn+S= sysrq
Fn+C= ScrLK
Fn+I= insert


@mgua

Wednesday, July 8, 2015

Thursday, July 2, 2015

greedy zabbix_sender chokes on too many data

Greedy zabbix_sender chokes on too many data

zabbix_sender tool performs a partial database import when fed with too many data at once.

I am using zabbix_sender tool to inject into a zabbix database data samples related to computer network statistics.

I start with a clean zabbix database, after clearing zabbix historical data for some items, so that the database is empty. Then I load new data with zabbix sender tool, and then I analyze the data mostly in graphical mode, checking the behaviours of the systems under particular loads, using zabbix graphical interface for historical navigations, statistics, and graph overlapping. When I am done with the analysis, I again delete historical values, and load a new batch of values.


I need to manage about 500.000 records. The problem I am describing here was not evident until data processed by my scripts was below 40.000 records. Problem was not evident using non differential valued zabbix items.


Problem is that, when loading the data via zabbix_sender, from an input file 

[...]
100.10.4.8 FailedConnectionAttempts 1434719102 114715
100.10.4.8 ResetConnections 1434719102 51829088
100.10.4.8 CurrentConnections 1434719102 298
100.10.4.8 SegmentsReceived 1434719102 321966025
100.10.4.8 SegmentsSent 1434719102 1445309521
100.10.4.8 SegmentsRetransmitted 1434719102 64705214
100.10.4.8 ActiveOpens 1434719402 981491
100.10.4.8 PassiveOpens 1434719402 312320429
100.10.4.8 FailedConnectionAttempts 1434719402 114732
100.10.4.8 ResetConnections 1434719402 51833025
100.10.4.8 CurrentConnections 1434719402 459

[...]

Using the following command line:
zabbix_sender -z 127.0.0.1 -T -i zbx-inputfile.txt

I get no errors when executing this, but older data are badly imported.

I think this is depending on data being processed by different threads of zabbix server (zabbix trappers) which can not talk each other considering that some data is to be interpreted as difference with the previous value. Differential data requires all the values to be sequentially injected and processed by a single zabbix-trapper thread.
Strangely, I did not find any mention to this potential problem, but you can not expect anything good if you are going to insert historical values in any series which is to be considered in differential mode, because data is processed before being inserted in the database, and the difference with the previous value is the actual value which goes in the database.
I tried to use -r (realtime) option in the zabbix_sender command line, but this did not give any improvement (actually I did not understand precisely what the realtime option is for).

I know that I am using Zabbix and zabbix_sender tools in a way that is probably quite far from the designer scopes, but I love this great software.

I was able to solve the issue slowing the speed at which data are sent to zabbix_sender.
In order to do this I built a filter tool which slows down a unix communication pipe.

The tool is a simple perl script called slower-pipe which sends some lines, then wait a specific time before sending the next chunk

cat zbx-inputfile.txt | slower-pipe.pl 100 2000 | zabbix_sender -z 127.0.0.1 -T -vv -i -

Using the tool to slow the input feed (100 lines per chunk and 2 seconds wait) the problem vanished.
The reason for this kludge to be effective lies probably in the fact that slowing down the input data flow, a single zabbix-trapper thread is considered enough, and calculations of the differential items are correctly processed.

here is the (perl) source code for slower-pipe.pl
just copy it, save it into slower-pipe.pl and then chmod +x appropriately


#!/usr/bin/perl
#
# mgua@tomware.it
#  this code is free software, GPL licensed.
#
# produces a slower passage over a pipe
#
# Syntax:
# slower-pipe chunksize msec
#   parameter1: chunksize (lines)
#   parameter2: milliseconds to wait after each chunk
#
#

use Time::HiRes qw(usleep nanosleep); # microsecond sleep

my $DEBUG = 0;
my $chunksize = 1;
my $msecwait = 10;      # milliseconds wait

if (($#ARGV + 1) ne 2) {
        die("Usage: slower-pipe chunksize msecwait\n   chunksize: number of lines per block\n   msecwait: milliseconds to wait after sending each block\n");
}

if ($ARGV[0] ne "") {
        $chunksizein = $ARGV[0];
        if ($chunksizein > 1) { $chunksize = $chunksizein; }
        print("chunksizein = [$chunksizein] chunksize=[$chunksize]\n") if $DEBUG;
}

if ($ARGV[1] ne "") {
        $msecwaitin = $ARGV[1];
        if ($msecwaitin > 1) { $msecwait = $msecwaitin; }
        print("msecwaitin = [$msecwaitin] msecwait=[$msecwait]\n") if $DEBUG;
}

my $usecwait = 1000 * $msecwait;


while () {
        print($_);
        if (($. % $chunksize) == 0) {
                print(" delay\n") if $DEBUG;
                usleep($usecwait);
        }
}


enjoy!


@mgua


Monday, June 1, 2015

Connect in graphical mode to remote linux server from Cygwin/X

Connect in graphical mode to remote linux server from Cygwin/X 
(and from windows terminal services client and vncviewer clients)


A very simple and basic howto
(last updated on jun 2 2015) 

 
Environment:
Windows "client" with a local installation of cygwin/X (download from cygwin.com).
Remote linux server, with graphical display capability.

Basic application access
  1. on remote linux, you need to have the "X11Forwarding yes" line in /etc/ssh/ssd_config
  2. run cygwin64 terminal on workstation, from there launch "startx"
  3. open a local terminal in the Cygwin/X:0.0 window (right click, open terminal here). From the terminal, the command "set | grep DISPLAY" should show DISPLAY=:0.0 (these 0.0 represent the display number and the visual number)
  4. from the terminal, run "ssh -Y user@remotelinux-address" and insert password. You should now get to the remote system in the same terminal window.
  5. from the terminal window, run "xterm", or any other graphical application. After a moment you should see the window come up.

Connection to main graphical login screen (to properly see complete desktop)
This setup requires proper configuration of XDMCP (X display Manager Control Protocol)
  1. On the remote linux you need to run a display manager that talks xdmcp. I was successful using xdm or gdm3. (for gdm3, on kali linux, I had to set enable=true in the [xdmcp] section of /etc/gdm3/daemon.conf)
  2. From windows cygwin command prompt run xlaunch (do not run startx), then choose open session via XDMCP. this sends some UDP datagrams to port 177 of linux server, after a while, traffic starts flowing in towards local workstation tcp port 6000 (X traffic). You need to have quite an open routing between the workstation and the remote server in order for this traffic to work. A non working symptom is that you just see a black window on your workstation screen.
  3. With these steps I had the keyboard perfectly working in the graphical terminal, and cut and paste to and from the graphical terminal is working well, even with non-ascii accented characters.


My configuration: 
Workstation: Windows 8.1 64 bit english
Remote linux: kali linux 1.1.0

references:
http://x.cygwin.com/docs/faq/cygwin-x-faq.html


Other remote graphical options:
the following options do not require the cygwin/X environment, but just a simple graphical bitmap client.

- xrdp: remote desktop protocol
  1. install xrdp on remote linux server 
  2. in remote linux server, start the xrdp service with "service xrdp start" (this starts the listener on the tcp:3389 port)
  3. from windows workstation, run mstsc (remote desktop connection), and login on the graphical page you will get. This will allow graphical login and full remote desktop visibility, with menu and applications

- xvncserver / vnc4server: virtual network computer
  1. install vnc4server on remote linux server
  2. launch vnc4server on remote linux server from a terminal session, define graphic resolution and define a password, and take note of the port identifier assigned to the new session listener. be it n. This starts the listener on tcp port 5900+n
  3. from windows workstation, launch vncviewer client and direct it to open a session on the linux server host, on the destination tcp port 5900+n. If n=1 then it is 5901
  4. when done, remember to kill the vnc4server with "vnc4server -kill :n"


Monday, February 23, 2015

Thinkpad T540p hissing noise in windows 8.1 64bit


Lenovo Thinkpad T540p/T440s/W540 loudspeaker constant hissing noise in Windows 8.1 64bit

last update 2015.feb.24


I recently got a Lenovo Thinkpad T540p to replace my old Lenovo Thinkpad T510 that after 5 years of service, was starting to be too old and slowish.

It is always the case, when we need to get used to new tools, that in the first period we still love more the old and worn out ones. It was indeed. Now, after a few weeks, it is getting better. My T510 was really well engineered.

Yesterday I solved an issue that was quite annoying.

My Thinkpad laptop T540p, in Windows 8.1 64 bits, produced a constant hiss from the right side loudspeaker. This sound was not loud, but very clearly audible when I use the notebook in my bedroom desk, in the evening silence.

There is a thread on the Lenovo thinkpad forum where many people complain about this problem, impacting at least Thinkpad T440s, Thinkpad T540p, Thinkpad W540

My understanding is that it affects all owners of these machines.
Lenovo, despite some declarations, was not releasing any official statement, and some people were very disappointed, because these laptops are quite expensive (my one was costing about 1700euros) and such problems are not to be expected on high end products.

I did my personal analysis, and noticed that I dont suffer the problem when booting in Ubuntu Linux.
Also I noticed that the hissing sound became louder and lasted for about 5 seconds just after any short sound was played thru the loudspeakers (like windows error sound).
Unwanted noise was there all the time, independently from loudspeakers volume, and always disappeared only when muting audio thru the Fn/F1 key.
Noise was also independent from power cord connected or not, and from battery power level.
Fiddling with advanced sound properties, like equalizer, dolby, etc did not produce any effect.

The Windows 8.1 OS that was available on the accompanying CDs was installing some Realtek High Definition Audio drivers that in my case were (maybe after some updates) at the 6.0.7188 level (mar 4, 2014)
Release check can be done via device manager, then selecting audio devices, then Realtek.


The main component of the Realtek audio driver is the file  RTKWHDA.SYS The release number shown in audio properties windows comes from this file.

Despite Lenovo update tool is not offering any new related download, but on Realtek website ( http://www.realtek.com.tw/downloads/downloadsCheck.aspx?Langid=1&PNid=24&PFid=24&Level=4&Conn=3&DownTypeID=3&GetDown=false#High%20Definition%20Audio%20Codecs ), an update is available, bringing RTKWHDA.SYS to 6.0.1.7246 (did this on feb 22.2015 - check the readme pdf)


After downloading and updating the driver for my Windows 8.1 x64 operating system, and going thru a couple of reboot, the problem disappeared.

----
Edit feb 23 2015: the problem is greatly reduced but did not disappear completely:
Play some sound (a song) with windows media player. Stop the playback, the noise can now be heard. Close media player: the noise goes away after about 6 seconds.


@mgua


.